At Eventbrite, we have a feature called webhooks. Webhooks can be thought of as the opposite of an API call. When using our API, developers either ask us for information, or hand us information. Both of these are initiated by you. In a webhook, we proactively notify developers (via an HTTP POST with JSON content) when actions happen on our site. The actions we currently support are as follows:
- Attendee data is updated
- An attendee is checked in via barcode scan
- And attendee is checked out via barcode scan
- An event is created
- And event is published
- An event is unpublished
- Event data is updated
- Venue data is updated
- Organizer data is updated
- An order is placed
- An order is refunded
- Order data is updated
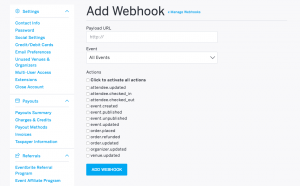
Webhooks are relatively simple to create. You can create/delete them in our admin web interface.

You can also create/delete them by using the API.
import requests
import json
from pprint import pprint

#This sample creates and then immediately deletes a webhook
def create_webhook():
    response = requests.post("https://www.eventbriteapi.com/v3/webhooks/",
    headers = {
        "Authorization": "Bearer YOURPERSONALOAUTHTOKEN",
    },
    data = {
        "endpoint_url": "http://www.malina.io/webhook",
        "actions" : "",
        "event_id": "26081133372",
    },
    verify = True # Verify SSL certificate
    )

pprint (response.json())
return (response.json()[u'id'])

def delete_webhook(hook_id):
    response = requests.delete(
    "https://www.eventbriteapi.com/v3/webhooks/" + hook_id + "/",
    headers = {
        "Authorization": "Bearer YOURPERSONALOAUTHTOKEN",
    },

    verify = True # Verify SSL certificate
    )

pprint (response.json())

if __name__ == '__main__':
hook_id = create_webhook()
delete_webhook(hook_id)
When various actions occur within our system, there is a pipeline of infrastructure through which these actions flow in order to finally result in an HTTP post to a webhook URL. In this post, I’ll describe that pipeline in detail.
Step 1
Some action happens in Eventbrite. Someone creates an event, or updates one. Someone buys a ticket, etc. This could happen on eventbrite.com or through one of our mobile apps, or through our API.
Step 2
Dilithium detects a change in Eventbrite’s database. Let’s take the example of someone updating an event. You might think that we have a place in the code where all updates of events happen, and that place in the code is also responsible for publishing to Kafka. However, it turns out that it’s not that simple. Due to event access happening in multiple parts of our codebase, and also due to our desire to *never* miss an action, we watch for them in the source of truth: our database. We do this via a piece of technology we call Dilithium.
Dilithium is an internal service that directly watches the replication logs of one of our databases. When it sees “interesting” SQL statements (an insert of an event, an update of an event, etc.) it packages the relevant data (what happened, the ID of the objects, etc.) as JSON and sends it to Kafka.
Step 3
Kafka receives a message from Dilithium. Kafka is a messaging system that has become fairly widely used, find out more at Kafka.org. For our purposes it can be thought of as a “pub-sub” pipeline. Messages get published to it, and a number of interested consumers subscribe to these messages so they are notified when they happen. Kafka is a good choice for the webhooks pipeline because the actions that cause webhooks to fire are also relevant to other systems at Eventbrite: maybe we need to set/invalidate a cache, or update our data warehouse, etc.
Step 4
The Webhook service receives an action from Kafka. You’ll notice that nowhere in the pipeline up to now do we look at the events and try to match them to an actual webhook. As a result, the webhook service receives many events (the vast majority of them) for which there is not a webhook registered.
The webhook service, which is part of our django application, starts by seeing if there is a webhook for any message it receives. It simply uses the same database we discussed before (with some caching provided by memcache) in order to do this. When it actually finds a webhook, it creates a JSON payload and is ready to actually make the HTTP request to the 3rd party developer.
The payload is JSON sent in an HTTP POST
{
"api_url": "https://www.eventbriteapi.com/v3/events/26081133372/",
"config": {
    "action": "event.published",
    "endpoint_url": "http://www.malina.io/webhook",
    "user_id": "163054428874",
    "webhook_id": "147601"
    }
}
Let’s take a closer look at what this payload object is made of.
The ‘api_url’ can be thought of as the address of the data that caused the webhook to fire. You could take url, append a personal OAuth token, plug it into your browser and view that data on Eventbrite’s API explorer.
The ‘action’ represents the change that we saw in the database. In the case of the example above, the event table was changed on the publish column. All possible actions can be found in the bulleted list at the beginning of this post. Each of those represent a change in the database.
The ‘endpoint_url is the value provided by the developer who registered the webhook and it is the address to which we send this payload.
The ‘user_id’ is the Eventbrite user id of the user who created the webhook.
The ‘webhook_id’ is the unique id that is assigned to this webhook.
Step 5
The final step is sending the actual HTTP request. As you can imagine, this can be (and usually is) the slowest part of the pipeline by far. These URLs are not ours, and we know nothing about them. Maybe they will timeout, maybe they will take 20 seconds to respond, maybe they will throw a 500 error and we will want to retry. Due to all these concerns, performing the actual HTTP request from the webhooks service is not feasible. We really need to do them asynchronously. For that we use a common async framework called Celery. We won’t talk in too much detail about Celery, but in brief, Celery implements a task queueing system that makes it very easy to take a section of code and run it asynchronously. You simply provide celery with a queueing mechanism (RabbitMQ or SQS for example) and it takes care of the rest. It’s this easy:
from proj.celery import app
import requests</code>

@app.task
def http_post_request(url, payload):
    response = requests.post(
    url,
    data = payload

    verify = True # Verify SSL certificate
    )

_log_response_to_database(response)

>>> http_post_request.delay(some_url, some_payload)
The celery workers make HTTP requests and store information about the request/response in the webhooks database. We do this so we have a complete record of all the external communications related to webhooks.
Step 6
Sometimes the webhook URL fails. In these cases we try again. Since we store all requests/responses in the database, it is easy to determine if we see a failure for a particular webhook request (and how many times it has fails.) To implement our retry policy, we have a cron job that, every 10 minutes will retry failed requests, up to 10 times. It is written as a django management command, and generally uses the same code to queue requests to django.
Lastly, let’s take a look at some of the things that are made possible by our webhook system. Zapier is one of our Spectrum Partners and is the largest consumer of our webhooks system. Zapier alone has tens of thousands webhooks registered which allow tens of thousands of Eventbrite organizers to automate sending their data to any combination of a selection of over 500 CRM applications.
Hello excellent guide
How do I specify the actions?
see the first screenshot , u will get a idea
how can i delete a webhook using the API